 Cardia User Guide
Cardia User Guide
Getting started with Cardia Greeting Card Supplies
If you're a visual learner, check out our getting started video tutorial here.
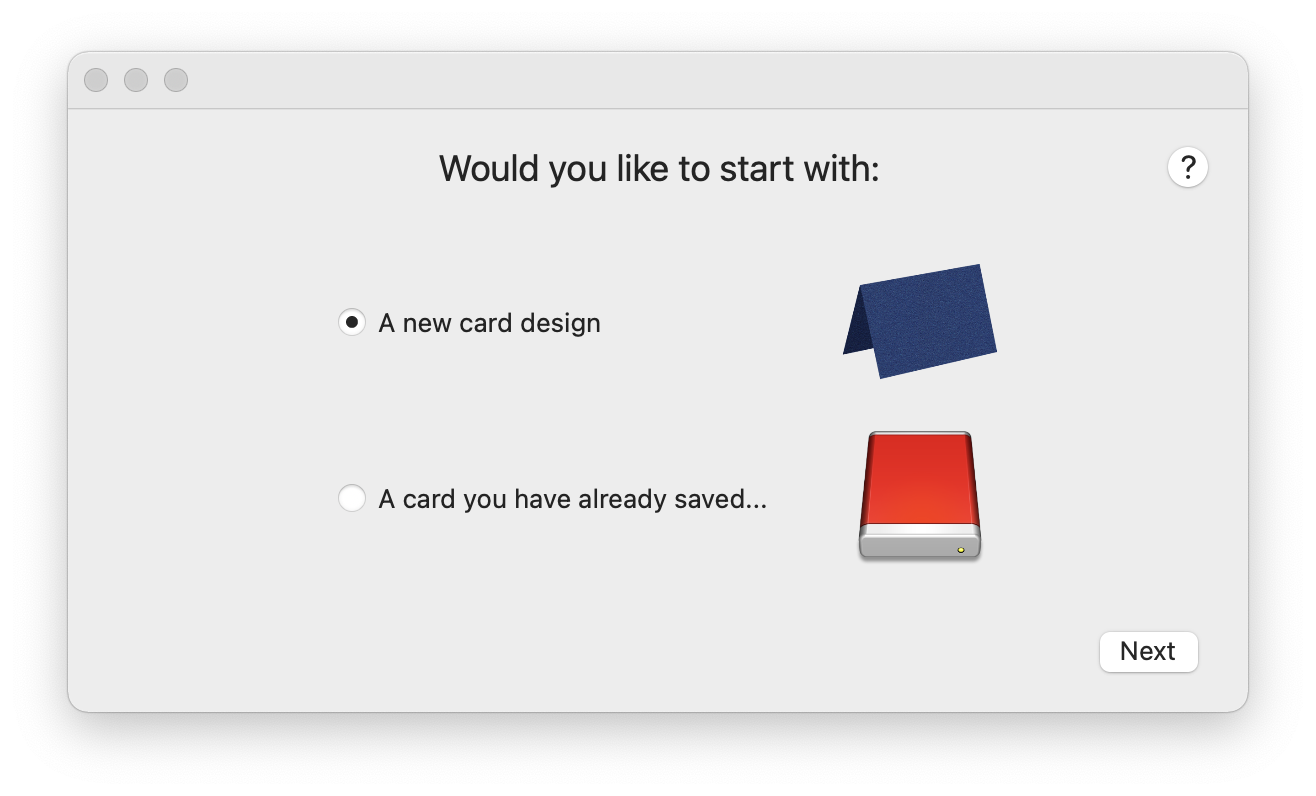
Otherwise let's dive in. First you need to choose whether to create a new card design or continue working on a previously saved card.
Let's select "A new card design" and press the Next button.
Next we need to give our card project a name. You can enter anything you like here. You can also come back and change it any time. For now, enter "Card One" and press the Next Button.

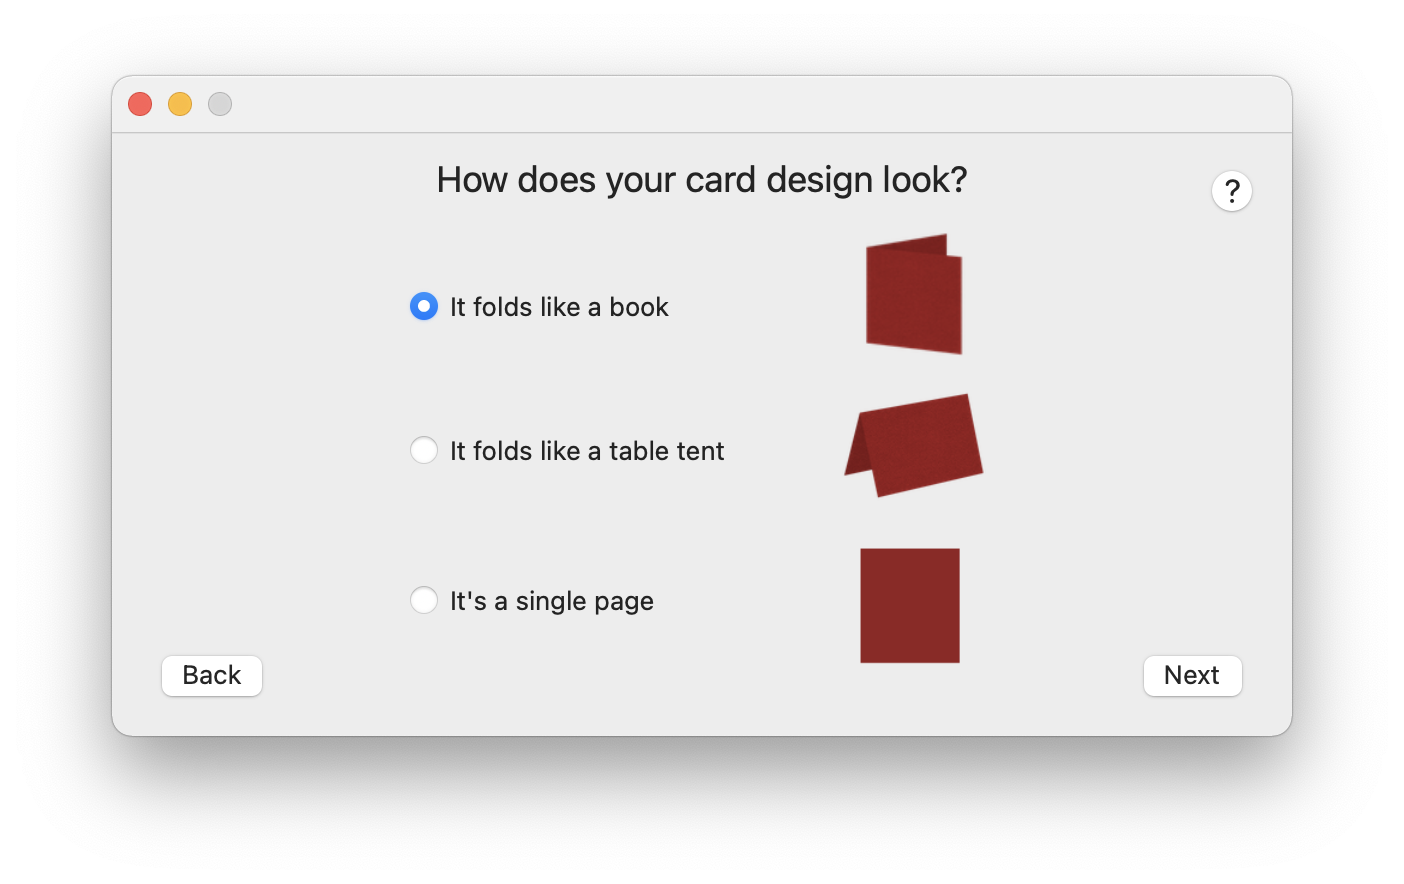
Now select the type of fold your card will have. You can select a paper style that will fold like a book, or fold like a tent, or just single page that will allow you to print on the front and back. A single page would be for something like a post card or a single sheet brochure. For this tutorial just select "It folds like a book" and press the Next Button.
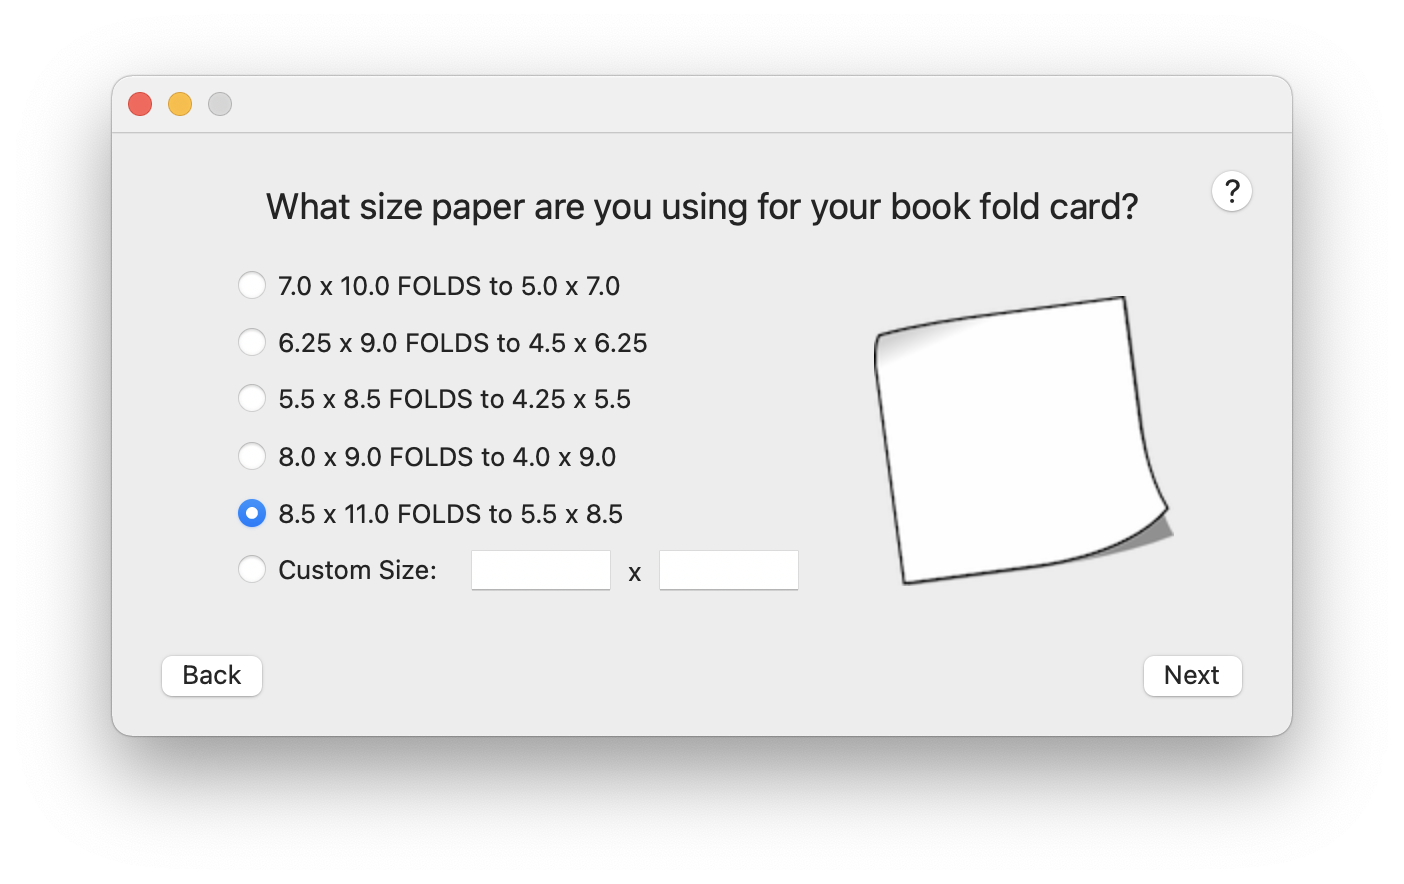
Next we select the paper size our card will use. You can use the preset sizes or even enter your own custom size cards. If your printer can handle it - Cardia can format it and send it to your printer. For this project let's use a card size of 8.5x11. This is a common size for printer paper so it will be easy and inexpensive to experiment with. Now press the Next Button.
Now you are at the main card design screen.
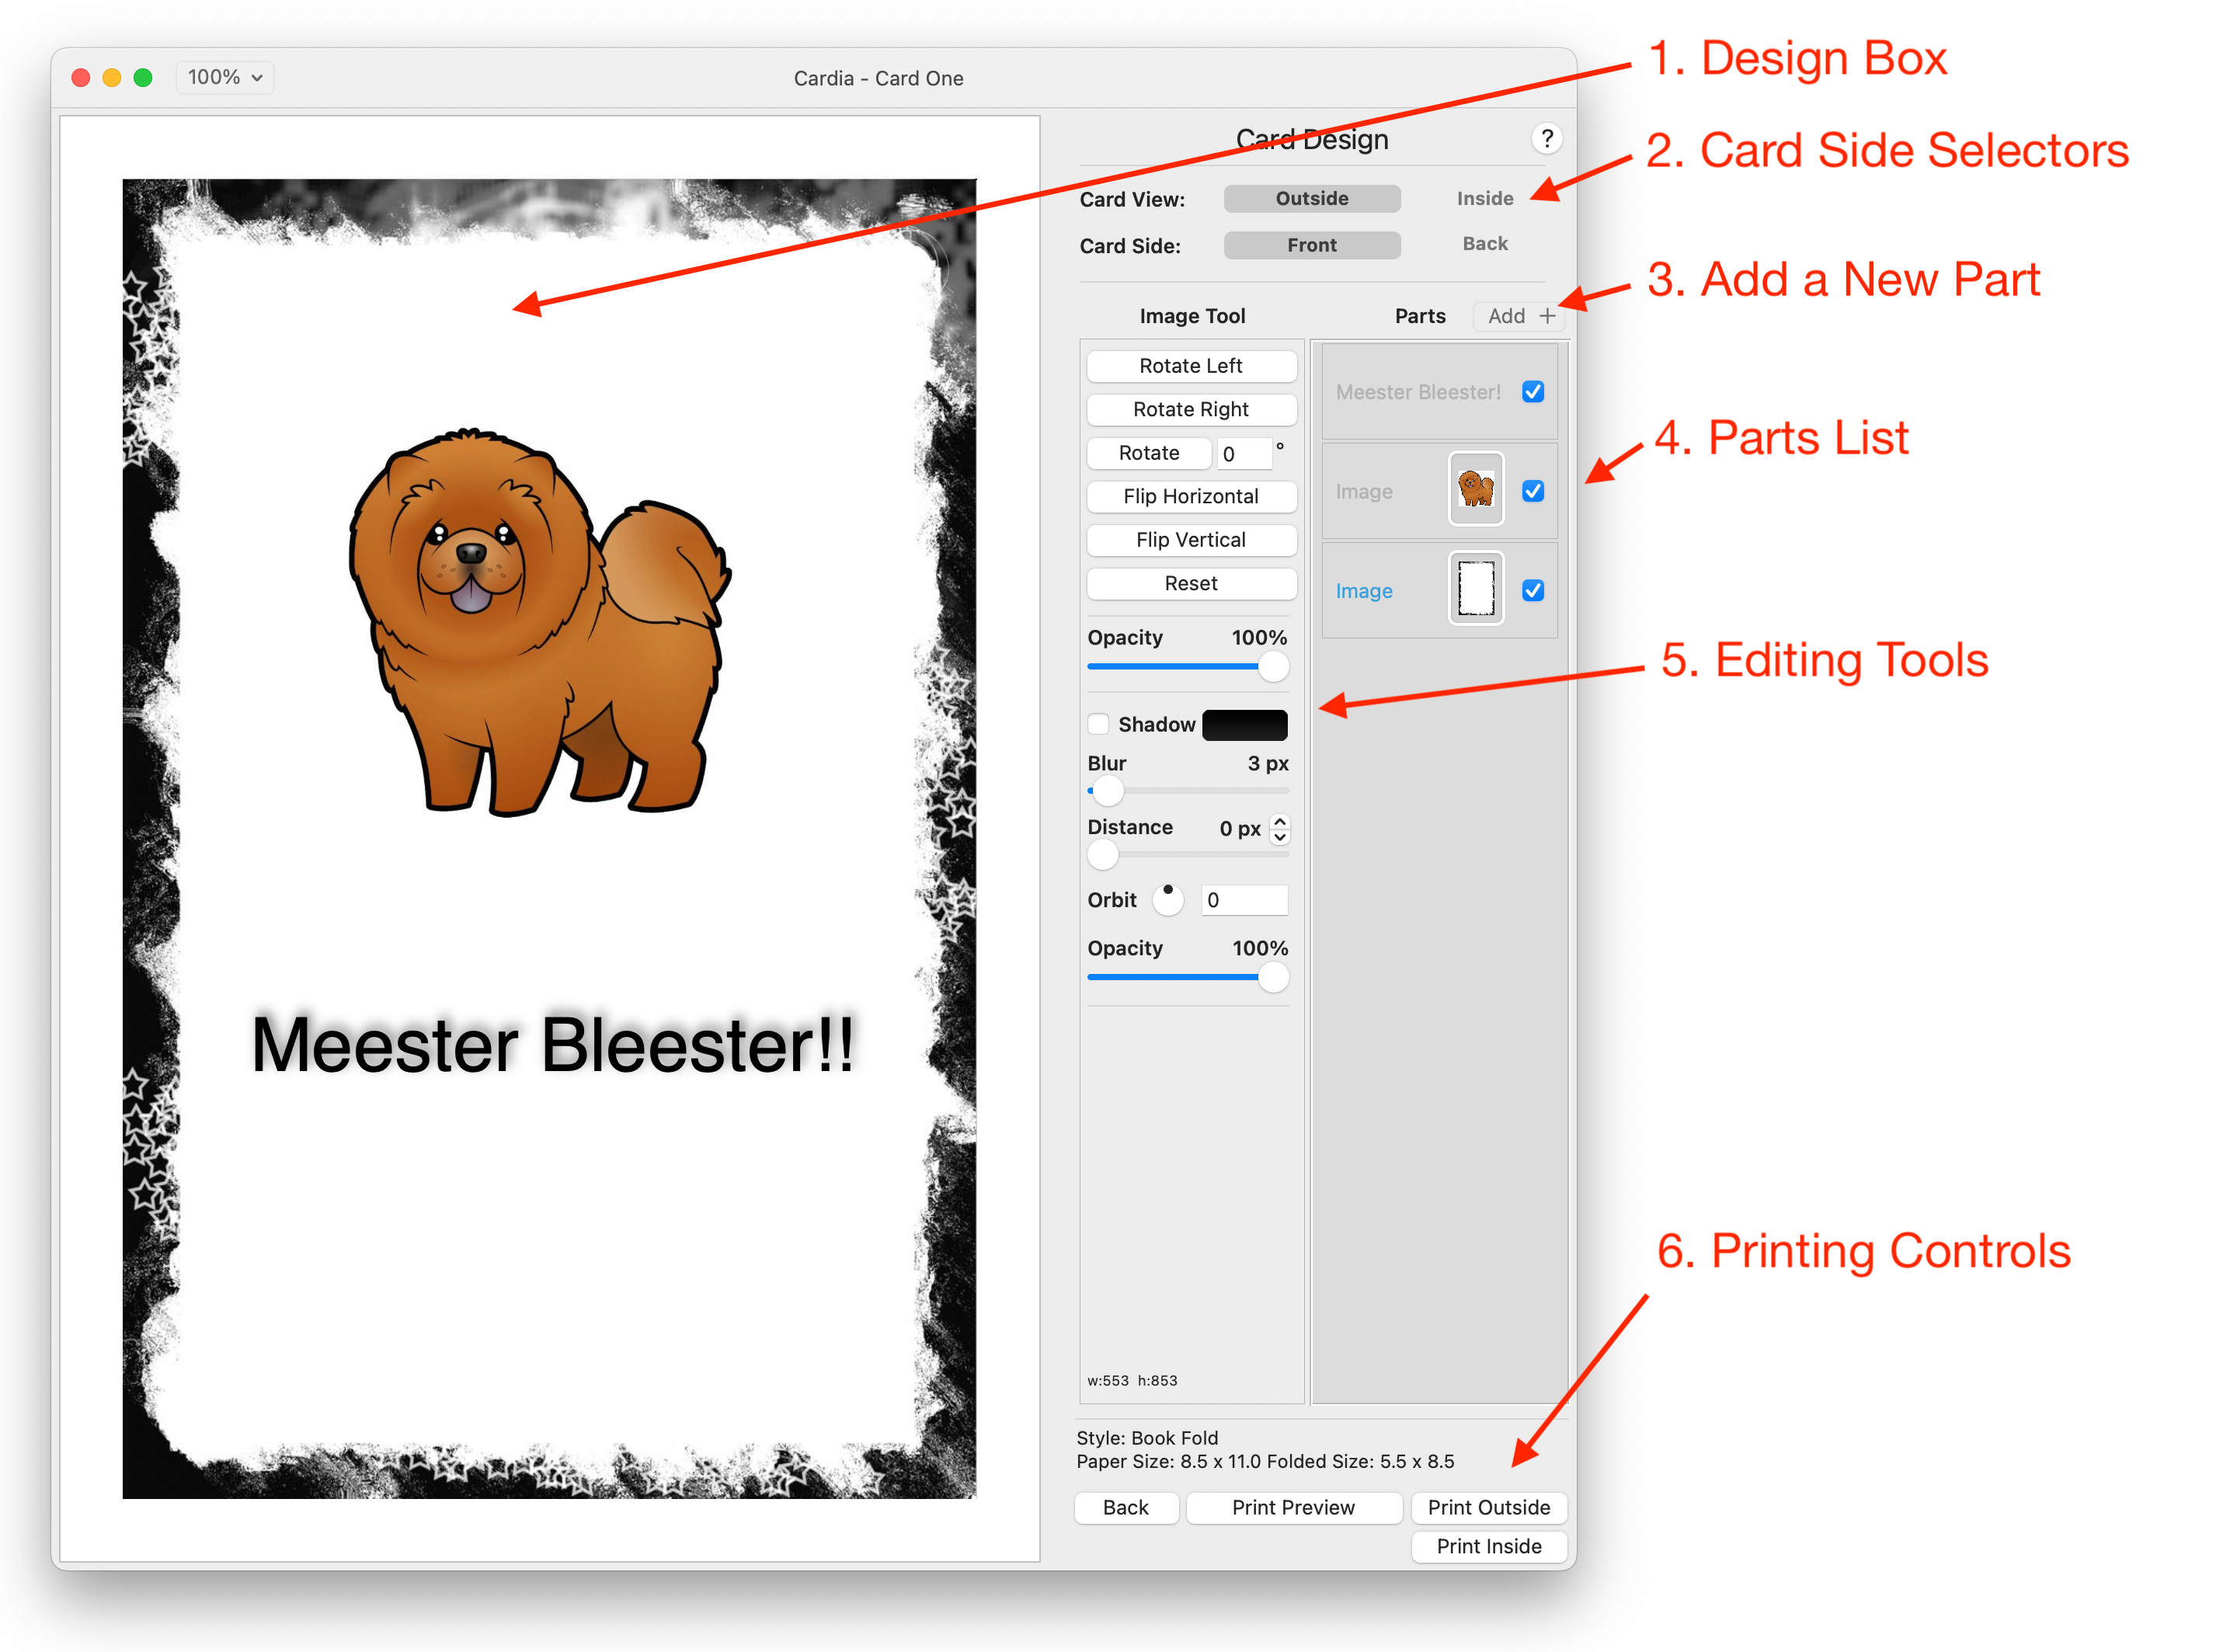
1. The Main Design Box
Here is where you will do most of your design work. You can create new parts by using the "Add +" button or just dragging images onto the blank design box. In the design box you can move, resize, and reorder parts.
2. Card Side Selectors
A card design is made up of either four or two sides. You use the design box to edit and build a specific side of your card. For instance, a "book" folded card has four sides - Outside Front, Outside Back, Inside Left, and Inside Right. A "table tent" folded card has also has four sides named - Outside Front, Outside Back, Inside Top, and Inside Bottom. Use the Card Side selector buttons to work with each side of your card.
3. Adding New Parts
By pressing the "Add +" button at the top of the parts list you can add parts such as Images, Text, Rectangles, Ovals, and QR Codes, etc. Using these primitive shapes and parts you can create anything. Selecting one of the parts from the drop down menu will place a default part on the screen and allow you to edit it by dragging them to a new position, resizing, changing colors and effects and so on. For images you can load them using the standard macOS file open dialog box or drag them in from a folder or the desktop. You can even drag in images straight from your browser.
4. The Parts List
The scrolling column on the right side has little icons that represent the parts you have added to your card. They are displayed in front to back order. Cardia uses "The Painter's Algorithm" to paint parts on the card. This means that the parts at the top of the column will be the foremost part on the card and will obscure and hide any parts under/after it. This is similar to how an artist paints a picture. The painter will start with the background and then paint the foreground parts.
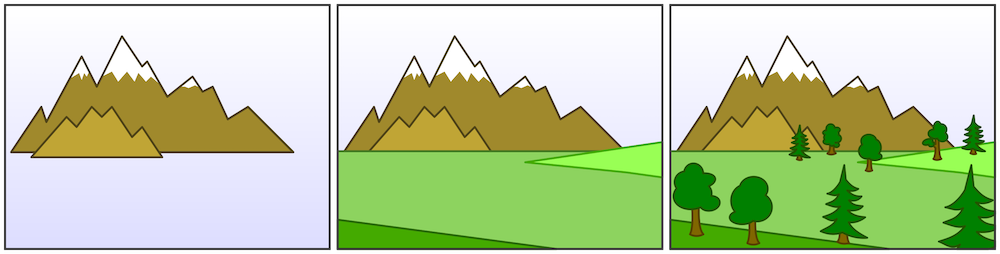
Painter's Algorithm - The distant mountains are painted first, followed by the closer meadows; finally, the trees, are painted. Although some trees are more distant from the viewpoint than some parts of the meadows, the ordering (mountains, meadows, trees) forms a valid depth order, because no object in the ordering obscures any part of a later object.
To change the order of your parts just drag the part's icon to a different position in the list and the design box will repaint itself using the new part order. To temporarily hide one of the parts remove the checkmark and Cardia will not paint that part. Re-check the box and the part will be painted again. To remove a part simply drag it out of the column to the right and it will disappear in a poof of dust. You can also right click on a part icon and select "Delete Part" from the drop down menu. Another item on the part icon right click dropdown menu is "Find Part and Move to Center". Sometimes during editing a part can get lost off to the side of the design box and you can't find it. Or maybe the part has gotten so large the sizing handles are no longer visible. If this happens just select "Find Part and Move to Center" from the right click drop down and the part will be found and then moved back to the center of the design box and resized to fit inside the box.
5. Editing Tools
Each part type has its own editing tools that are specific to that part. For instance the Text part editor not only has rotation and shadows but all the normal settings you would use for editing and formatting text. The tools automatically change when you select or add a new part.
Some Tips for Editing Parts -
Images: When resizing an image by dragging a corner you will notice the aspect ratio for the image remains intact. (The ratio between the width and height remains the same) This is usually the wanted behavior so that your image does not get stretched or squished. But sometimes you may want to stretch an image just a bit to make it fit. In that case, hold down the shift key when you start a drag from any corner and then the aspect ratio is no longer constrained during this drag.
Pressing the Center button will center the image in the center of the design box. If you hold down the shift key while pressing the Center button the image will move to the center and then resize to the
largest size that will fit in the design box. (Remember, you can always do an Undo if you do not like the results)
Working With Text in Cardia:
At first, working with text parts might seem a little tricky - but once you get the hang of how it works, you will see how easy it really is. The challenge with creating and editing text parts is the text part does not know exactly what your intentions are when you click on it?
Do you want to simply move or resize the part? Or do you want to edit the part? Cardia has to figure out your intentions with just one click.
Try this - add a new text part by pressing the "Add +" button in the top right of the main window - and select “Text” to add the part. This will drop a generic text part in the center of the card’s design box.
If you have not already, go up to Cardia’s menu bar and under View select “Grabby Hands”. This will cause the cursor to turn a little hand icon when the mouse moves over a part. (This setting sticks across app starts and stops).
Now, move the mouse and hover over the new text part you just made. Notice how when you are inside the part’s green sizing box the cursor turns into a hand? As long as the text is not being edited - hovering over the text part will turn the cursor into a hand - no matter if the part is selected or not.

This means you can drag the part somewhere. Give that a try. Just move the mouse till it turns into a hand, press down on and hold the mouse button and then drag and then let go. That’s how you drag a part to move it somewhere.
Let’s look at how to start editing a text part. Move the mouse over the text part to the place in the text where you want to start editing it. If you want to edit the whole thing just click on any text inside that box. Just a single fast click. Now the cursor turns into the standard text editing “I-beam” cursor and a flashing caret appears at the point of the edit.
Now you can start typing, or select a swatch of text, or do any of the editing you normally would do on a Macintosh application.
The text editor works like every other Macintosh application. For instance if you wanted to select the entire run of text, just click in the text box once to start editing, then do a command ⌘-A key combination and all of the text is selected. From there you can go over to the text tool on the right and change the font face, font type, font size, etc.
Oh great - now how do I get out of editing? Again Cardia needs to try to determine your intentions with just a single click. Here’s the trick to that. You have de-select the part you are editing. There are two ways to do this.
The first way is just click anywhere outside the text part’s sizing box. That’s the easiest way. Just click outside of the text part’s sizing box, anywhere in the design box - even on another part if you want. This will deselect the part and you can move on to editing other things.
The second way is what if you want to stop editing and then drag the part somewhere or add shadows? Here’s the quick way to do that in one step. Just click on the text part in the parts list column on the right side. This will stop the editing process, select the part, and set the text part up so you can drag it somewhere.
The Usual Suspects:
When editing a text part all of the usual Macintosh text editing tools are available and work exactly the way they do in every other Macintosh application.

If you want even more control over your text press the gear ![]() icon in the third row in the text tools window.
This will open a new popup that will give you more settings to apply to your text. You can set character spacing, line spacing, super and subscripting as well as ligatures.
icon in the third row in the text tools window.
This will open a new popup that will give you more settings to apply to your text. You can set character spacing, line spacing, super and subscripting as well as ligatures.

To add outlines to your text, just check the Outline box, select a color and a width. Here's good one - if you use a negative number for your outline width it will cause the inside text fill to be transparent.

To close the More Text Options popup just click on the gear again - or anywhere else outside the popup.
Working with Shapes:
There are two kinds of shapes you can add to your card. Rectangles and Ovals - both available in the Parts Dropdown menu. These can be useful for making a border or even a solid shape. To add a shape just select it from the dropdown. From there you can select the color. You can even add a fill color - and apply all the effects the other parts have such as rotation and shadows.
Adding a QR Code to Your Card:
A QR code is a great way to let your customers, family, and friends find your website or email address. A QR code is one of those square bar codes you see on packages. When a phone camera is focused on the code, a link will appear on the phone that the user can press and they will be taken to a website that the QR code points to. QR codes even work with email addresses. In fact you can type almost anything you want and it will show up when the QR code is scanned. QR codes are usually stored on the back of cards along with your other information such as a company name and maybe the card name. There's nothing stopping you from making a whopper big QR code and putting it on the front of the card or the inside of the card for comedic effect. To create a QR code move to the page where you want to add the code. Then from the Parts Dropdown Menu add a QR code. The code will drop in the center of the page. Now you can move and resize the code as you wish.
On the tool bar on the right press the "Update QR Code" button and you will see a text field where you can add anything you want. Once you are satisfied with the text, press OK and a new QR code will be generated. To test your new code, hold you phones camera up to the code and make sure it does what you want. Like all the parts in Cardia, the QR code will save with your project.
Dragging Parts:
If you want to drag any of the parts, just hover over it selected or not then hold down and drag.
Nudging: By using the arrow keys you can slowly nudge a part into position. This is useful when you need smaller more precise alignments than when using the mouse. For instance nudging a rectangle into one of the corners. Nudging allows you to precisely place a part on a single pixel. To nudge a part, just select it. (For text parts, make sure you are not in edit mode) Then just use the 4 arrow keys to move the part around with pixel precision.
Cut, Copy, and Paste in Cardia:
You can copy a part in Cardia several different ways. If you simply need to duplicate a part the fastest way is an Option-Drag. Just hover the mouse over the
part you want to duplicate, hold down the option key, then press the left mouse button and drag. A perfect copy will pop out. Cut, Copy, Paste, and Select All are available from the usual shortcut keys as well as the edit menu. There are several ways to select a part to be copied or deleted. Just click on the part and you can cut or copy it. If you want to select more than one part to be cut or copied - hold down the shift key and click the part. The part will get a light blue glowing rectangle letting you know its been selected. Keep shift-clicking on parts you want to select. Shift-click a selected part to deselect it. Now you can cut or copy all the parts in one action. An even faster way to select parts is to lasso them. Just hold the mouse down anywhere on the canvas and drag the mouse to lasso the parts you want to cut or copy. Let the mouse up and all the parts will be selected. We're making marching ants cool again!
Moving Parts to a Different Card Side: Sometimes you might decide you want to duplicate or move parts to another card side without having to go back to the folders they came from. To do this, just use one of the copy methods above then change to the new card side and paste the parts.
Grid Snapping: Under the View menu you can tell Cardia to snap parts to an imaginary grid. This will sometimes make it easier to line up multiple parts in the design box. You can make the grid visible or not. The grid will not print on the card when the card is sent to the printer.
Use Alignment Guides: To easily align parts on the horizontal or vertical axes in the design box you can tell Cardia to snap parts to a pair of imaginary centering lines. You enable this under the View Menu and select Use Alignment Guides. When you are dragging a part to place it - if you have Use Alignment Guides enabled a faint gold line will appear as you get close to having the object centered in either the horizontal or vertical center of the design box. If you keep the drag within a few pixels of these gold lines you part will snap to the center as you drag it up and down. When you move away from the center or let the mouse button up these lines will fade out.
Rulers: To enable rulers select Use Rulers under the View menu. This will place horizontal and vertical rulers at the edges of the design box. If you are not dragging a part a single tick mark will show on the rulers where your mouse is on the card. When you drag a part - three tick marks will appear on each ruler. The middle tick mark points out where the center of your part is. The top and bottom - or left and right ticks show where the edges of your part is and you can use these to align any combination of tops, bottoms, lefts, rights, or middles.
Bringing Parts to the Front of Transparent Parts: Sometimes you might click on a part, for instance a text part but it won't select? The
problem might be there is another part in front of it that has a transparent section. Since that part was on top, you are actually selecting it. If
that's the case, just move over to the parts column, grab the little part Chicklet and move it above the part with the transparency. (see
Painter's algorithm above).
Project Workflow Tip: To quickly navigate to related files or folders while working on a saved project, click the project title at the top of the window. This opens a dropdown menu showing the folder hierarchy, from the project's location to the root of your storage device, similar to apps like Pages or Numbers. Select any folder in the list to open it directly in Finder, making it easy to access other images or resources for your project.
6. Background Colors
You can set a background color for each side of your card. To set a card's side background color first uncheck the "Use Clear Background" checkmark. Next press the "Background Color" colorwell and choose a color. To remove the color re-check "Use Clear Background".
A note about filling the background on printed cards... Printing a solid color to paper can be tricky. Filling the background with a solid color might not always work like you want. Not all inkjet or laser printers can print a solid page of color perfectly. It's also possible that the printer can not print all the way to the edge of the paper which will leave a white border. (You could always trim that border away). If you want a color background it might be best to used colored paper. However there are issues with using colored paper. Most inkjet and laser printers can not print white so you would have to have a workaround for that. One idea for printing cards with
solid color backgrounds is create your card then tell the Macintosh print panel to save the card as a .PDF. Then you can take the .PDFs to a professional printer and they
can print the card perfectly using their industrial printers which have an infinite number of finishes.
7. Setting the View
Zoom: You can increase the visual size of the design box you are working with by changing the scale of the design box with the scale dropdown in the top left corner of the toolbar. You can pick a percentage you want or just select "Zoom to Fit" and the design box will grow to fit the available space. Note that this will not change the physical size of the printed card.
Appearance: Using the View->Appearance menu you can tell Cardia to use light or dark mode - or have it set to auto and it follows the time of day.
Grabby Hands: Under the View menu this setting when enabled will change the cursor from an arrow to a hand when the cursor is over a part.
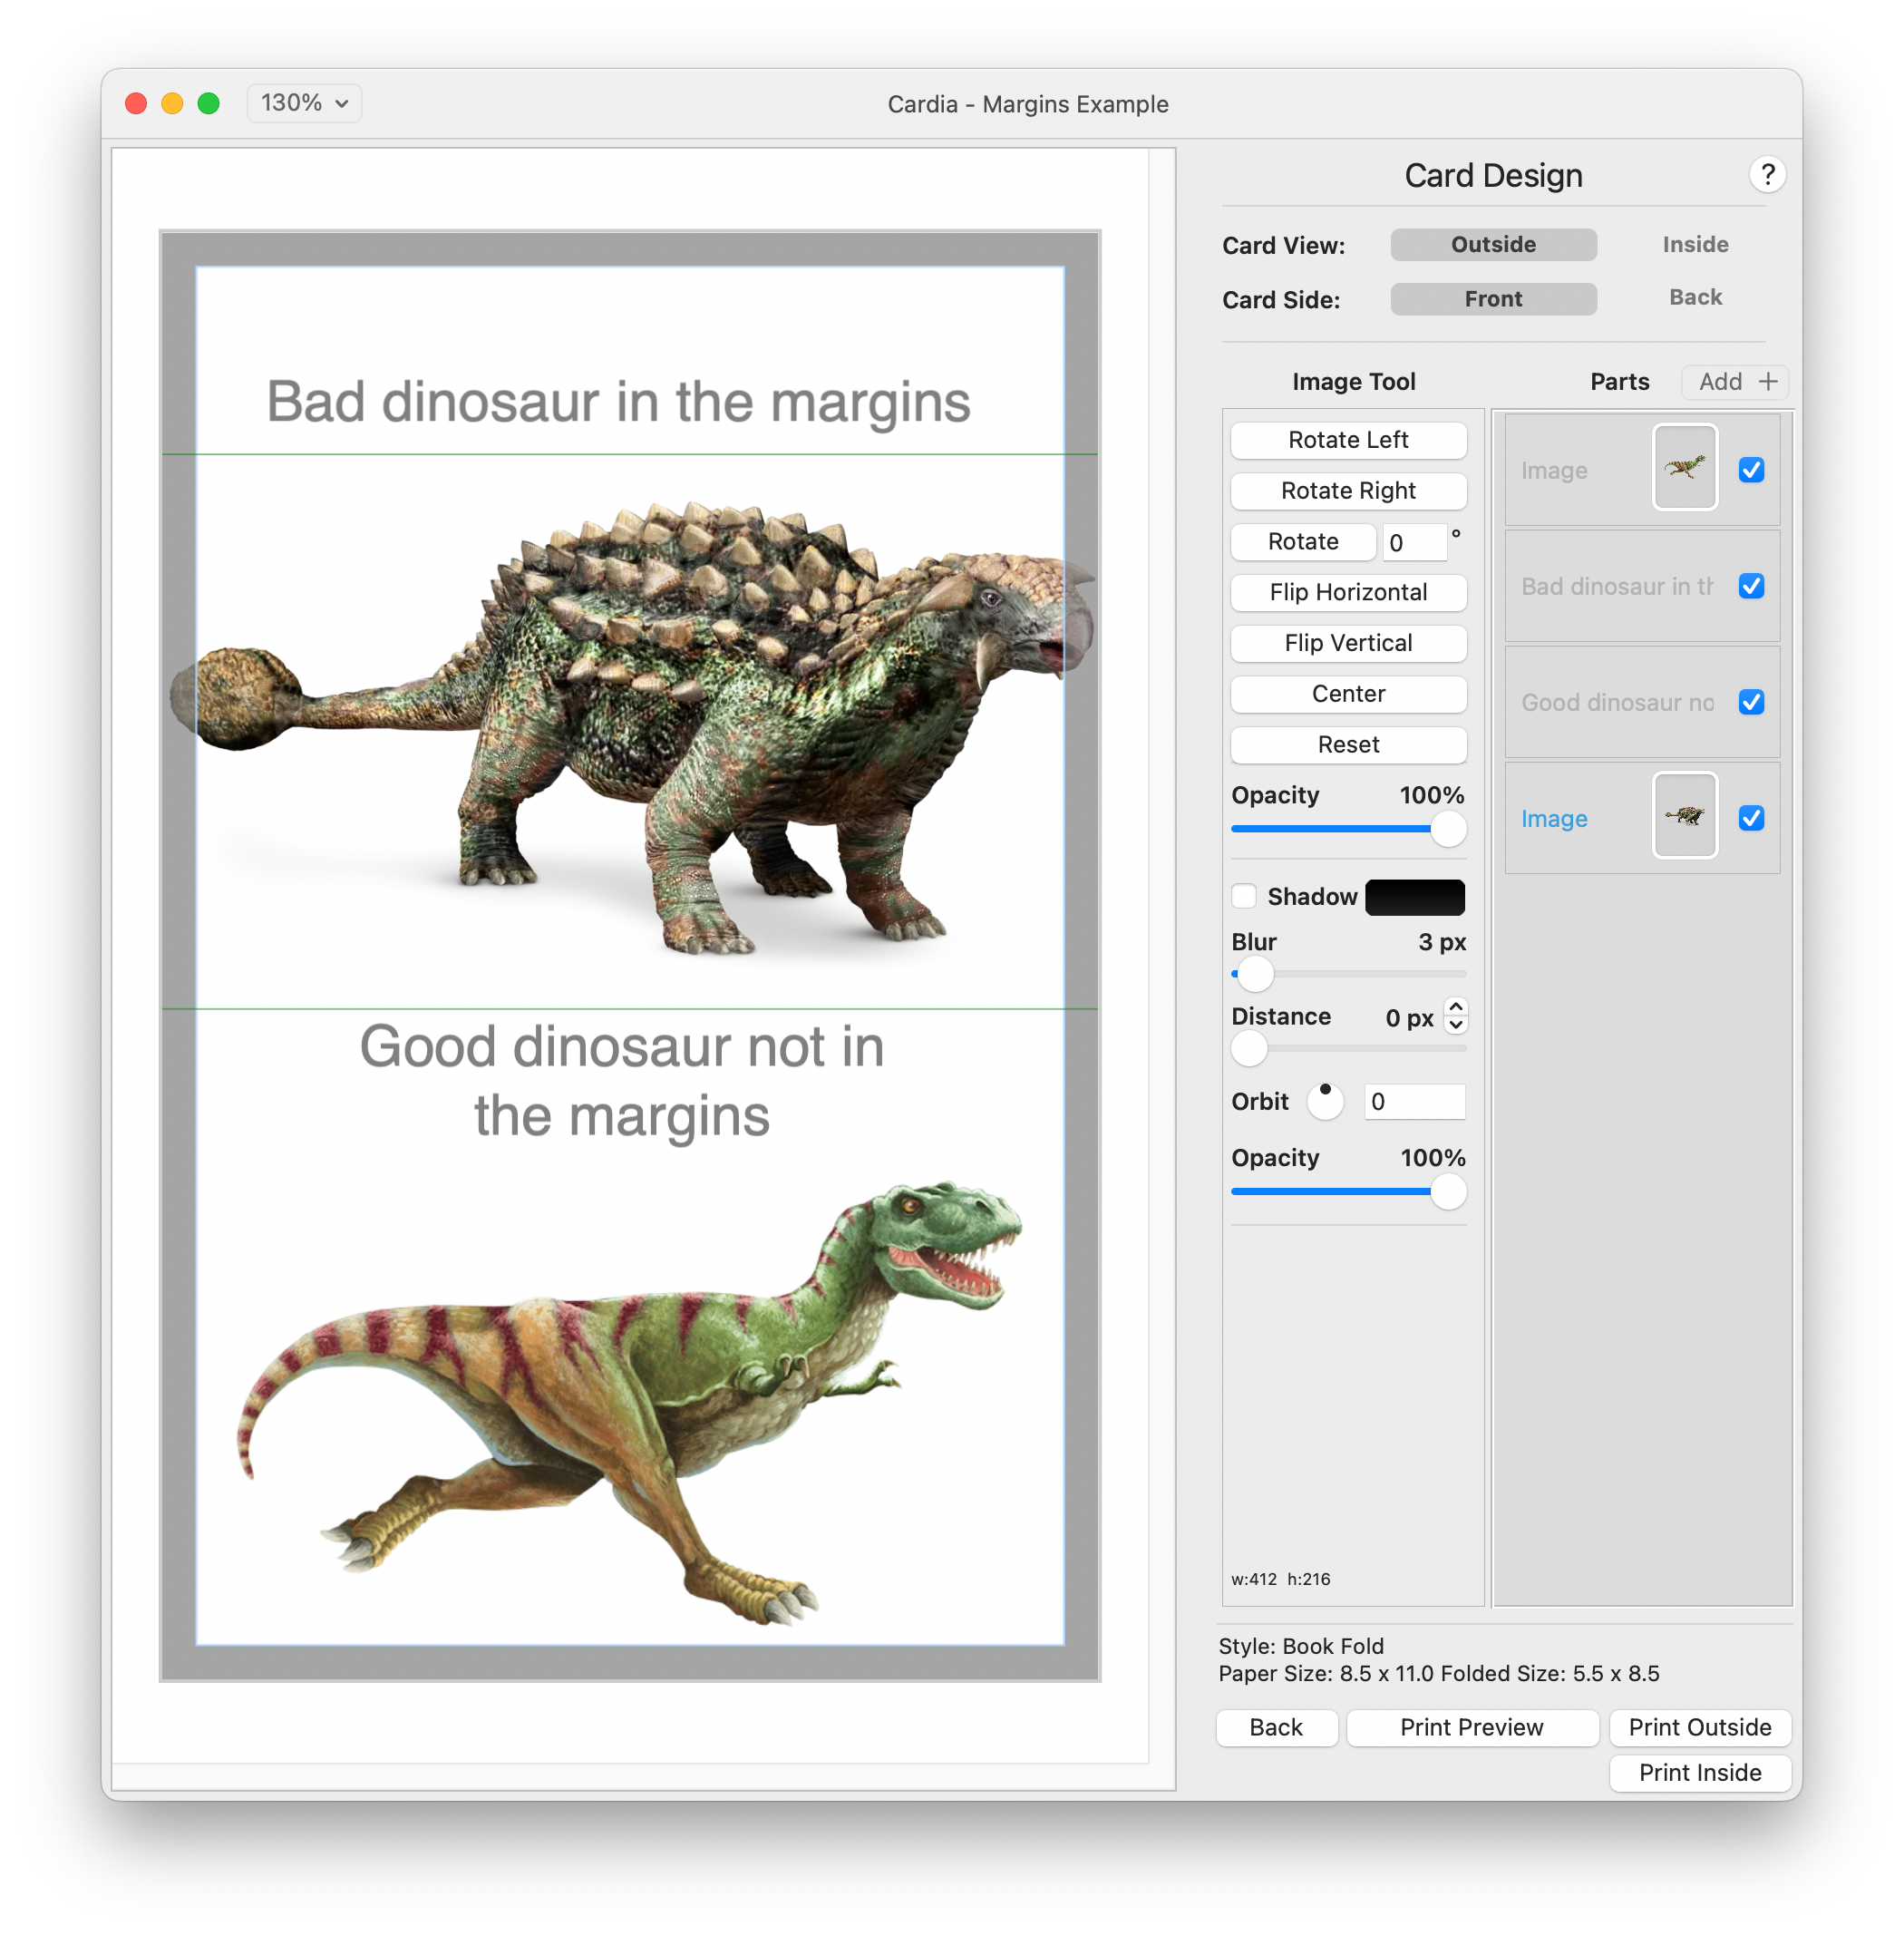
8. Virtual Margin Guides
One of the most useful and quite amazing features of Cardia is the Virtual Margin Guideline tool found under the View menu. When enabled this will draw a translucent gray frame around the edges of the design box showing you where the printer's margins are. This lets you design the card and visualize how your art can fit inside the margins. This frame not only shows you where the margins are but it also adds the correct margin to the spine of the card so your artwork can be symmetrically centered on each face of the card. The default margin is 0.20 inches but you can set it to whatever works for you and your printer. This border will not print with your card or in the 3D preview, it's just a guide to let you know where the unprintable areas are on the card. If you do let a part slide under the translucent frame, the printer will try to print it. Note: If you are using a color background it will be clipped to the margin guides setting at print time so you do not have to worry about solid colors going to the edge of the paper if that's not what you intended.

It gets better! There is a setting in the virtual guidelines dialog box called "Allow Margins to Clip Artwork". With this box checked now the virtual guidelines will act as a mask and clip the
artwork when it goes to the 3D preview or the printer. This is useful if your art is too large to fit and you do not want to cut down your image or shrink it. Now just slide it under the mask and
it will get clipped when it goes to the 3D preview or the printer. Your artwork is never modified in Cardia.
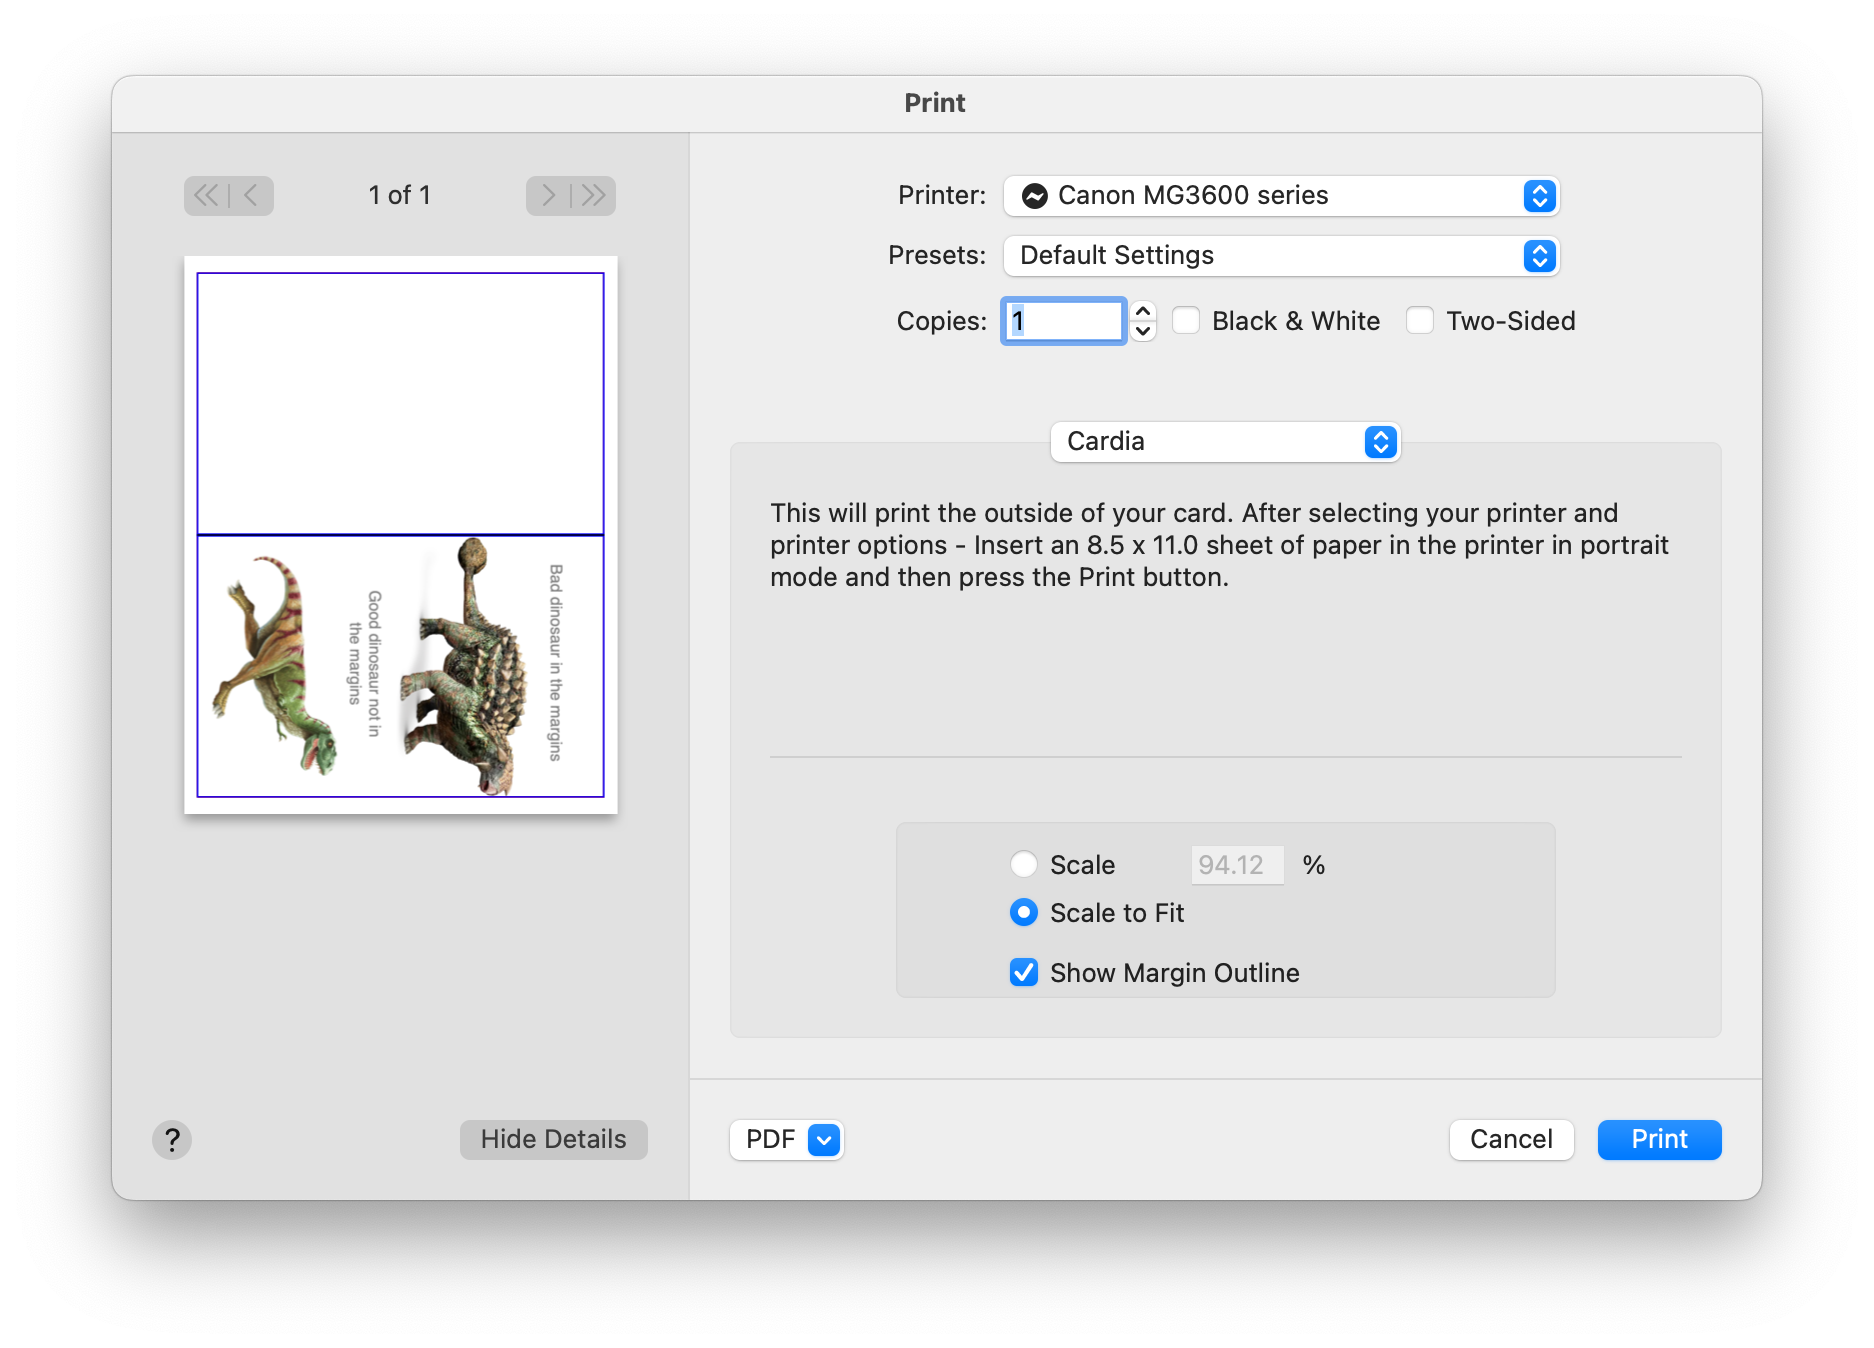
This is an example of clipping not enabled. Anything in the margins will get sent to the printer.

This is an example of clipping enabled. The virtual guidelines will clip any parts that are under them before sending your card to the printer.

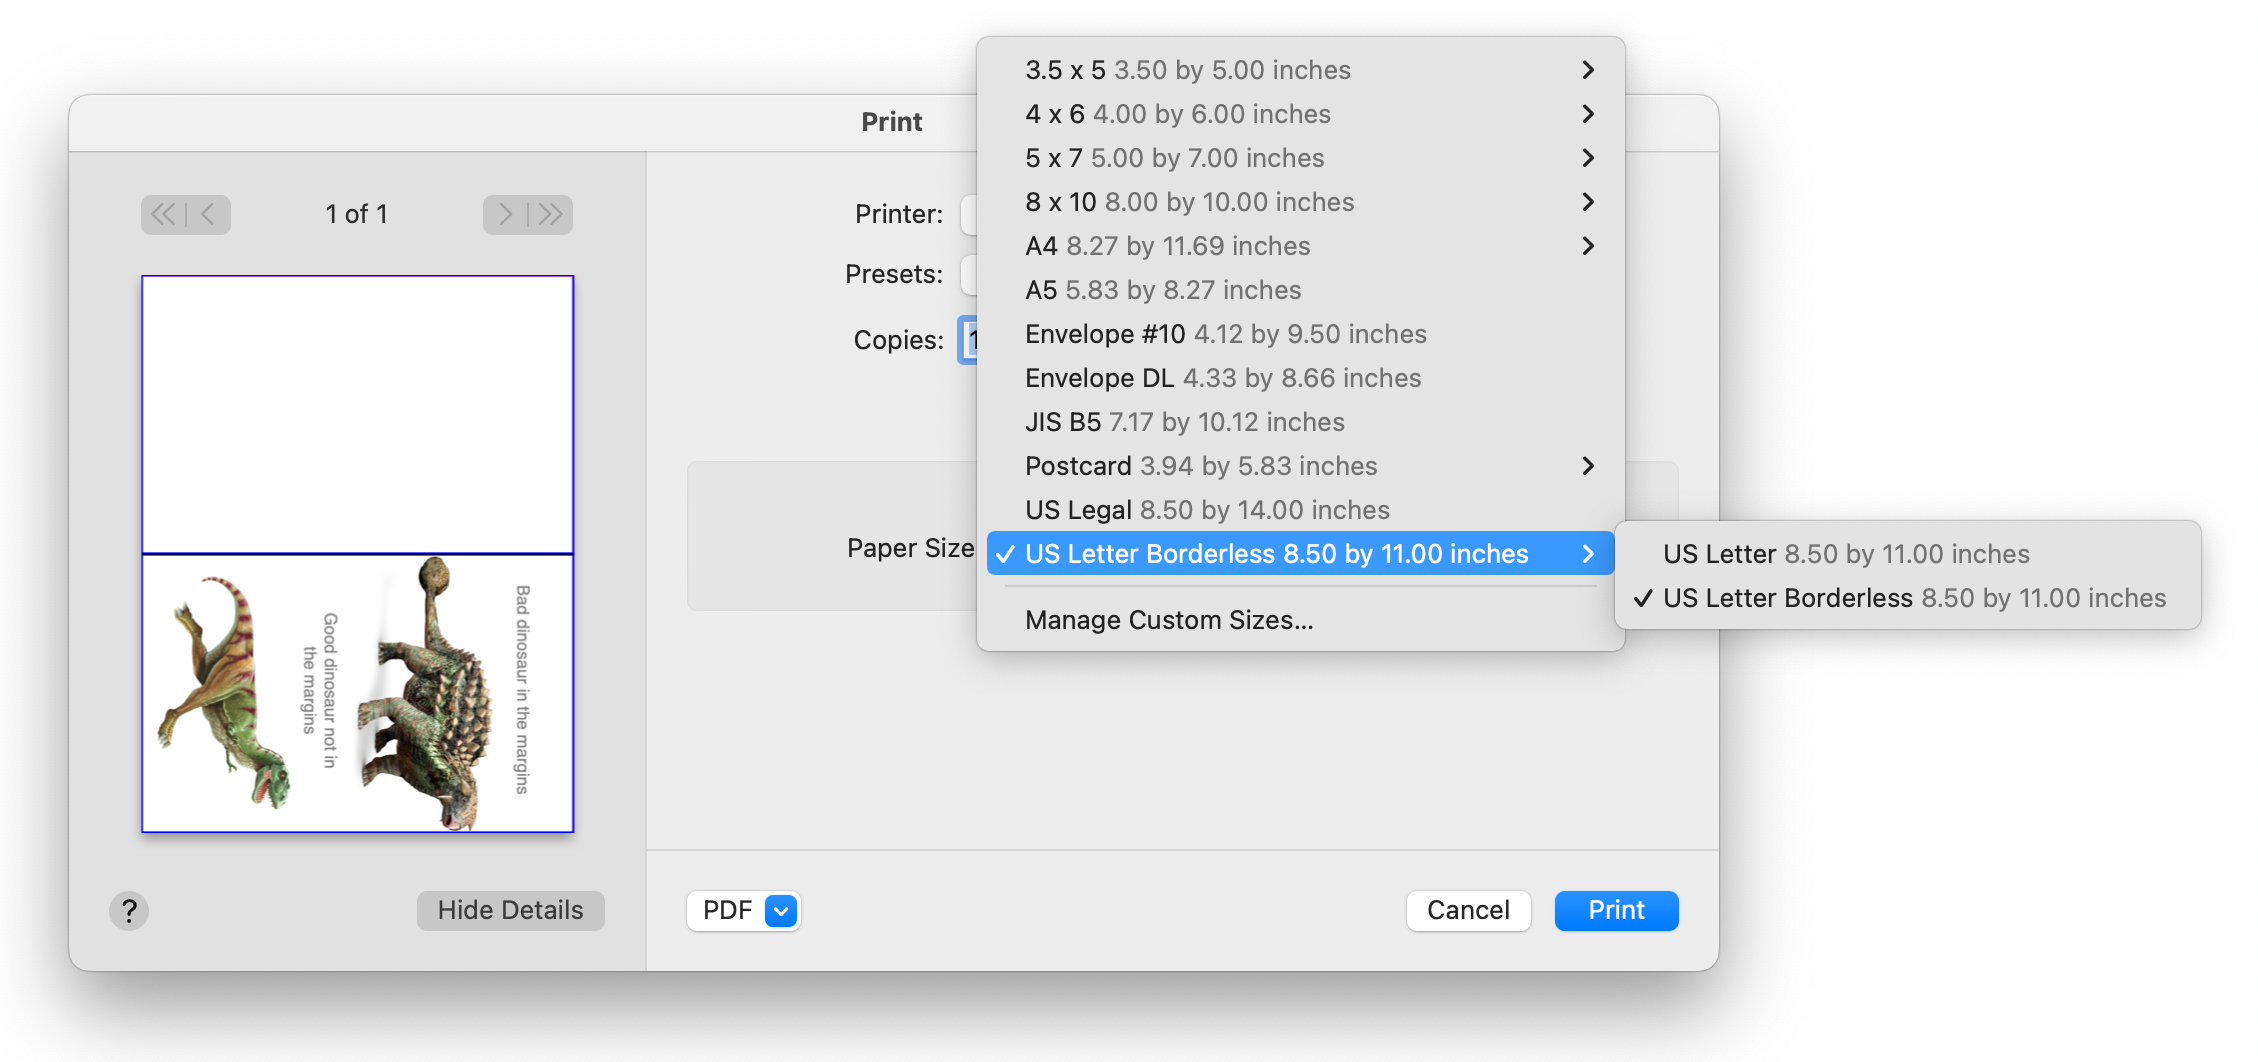
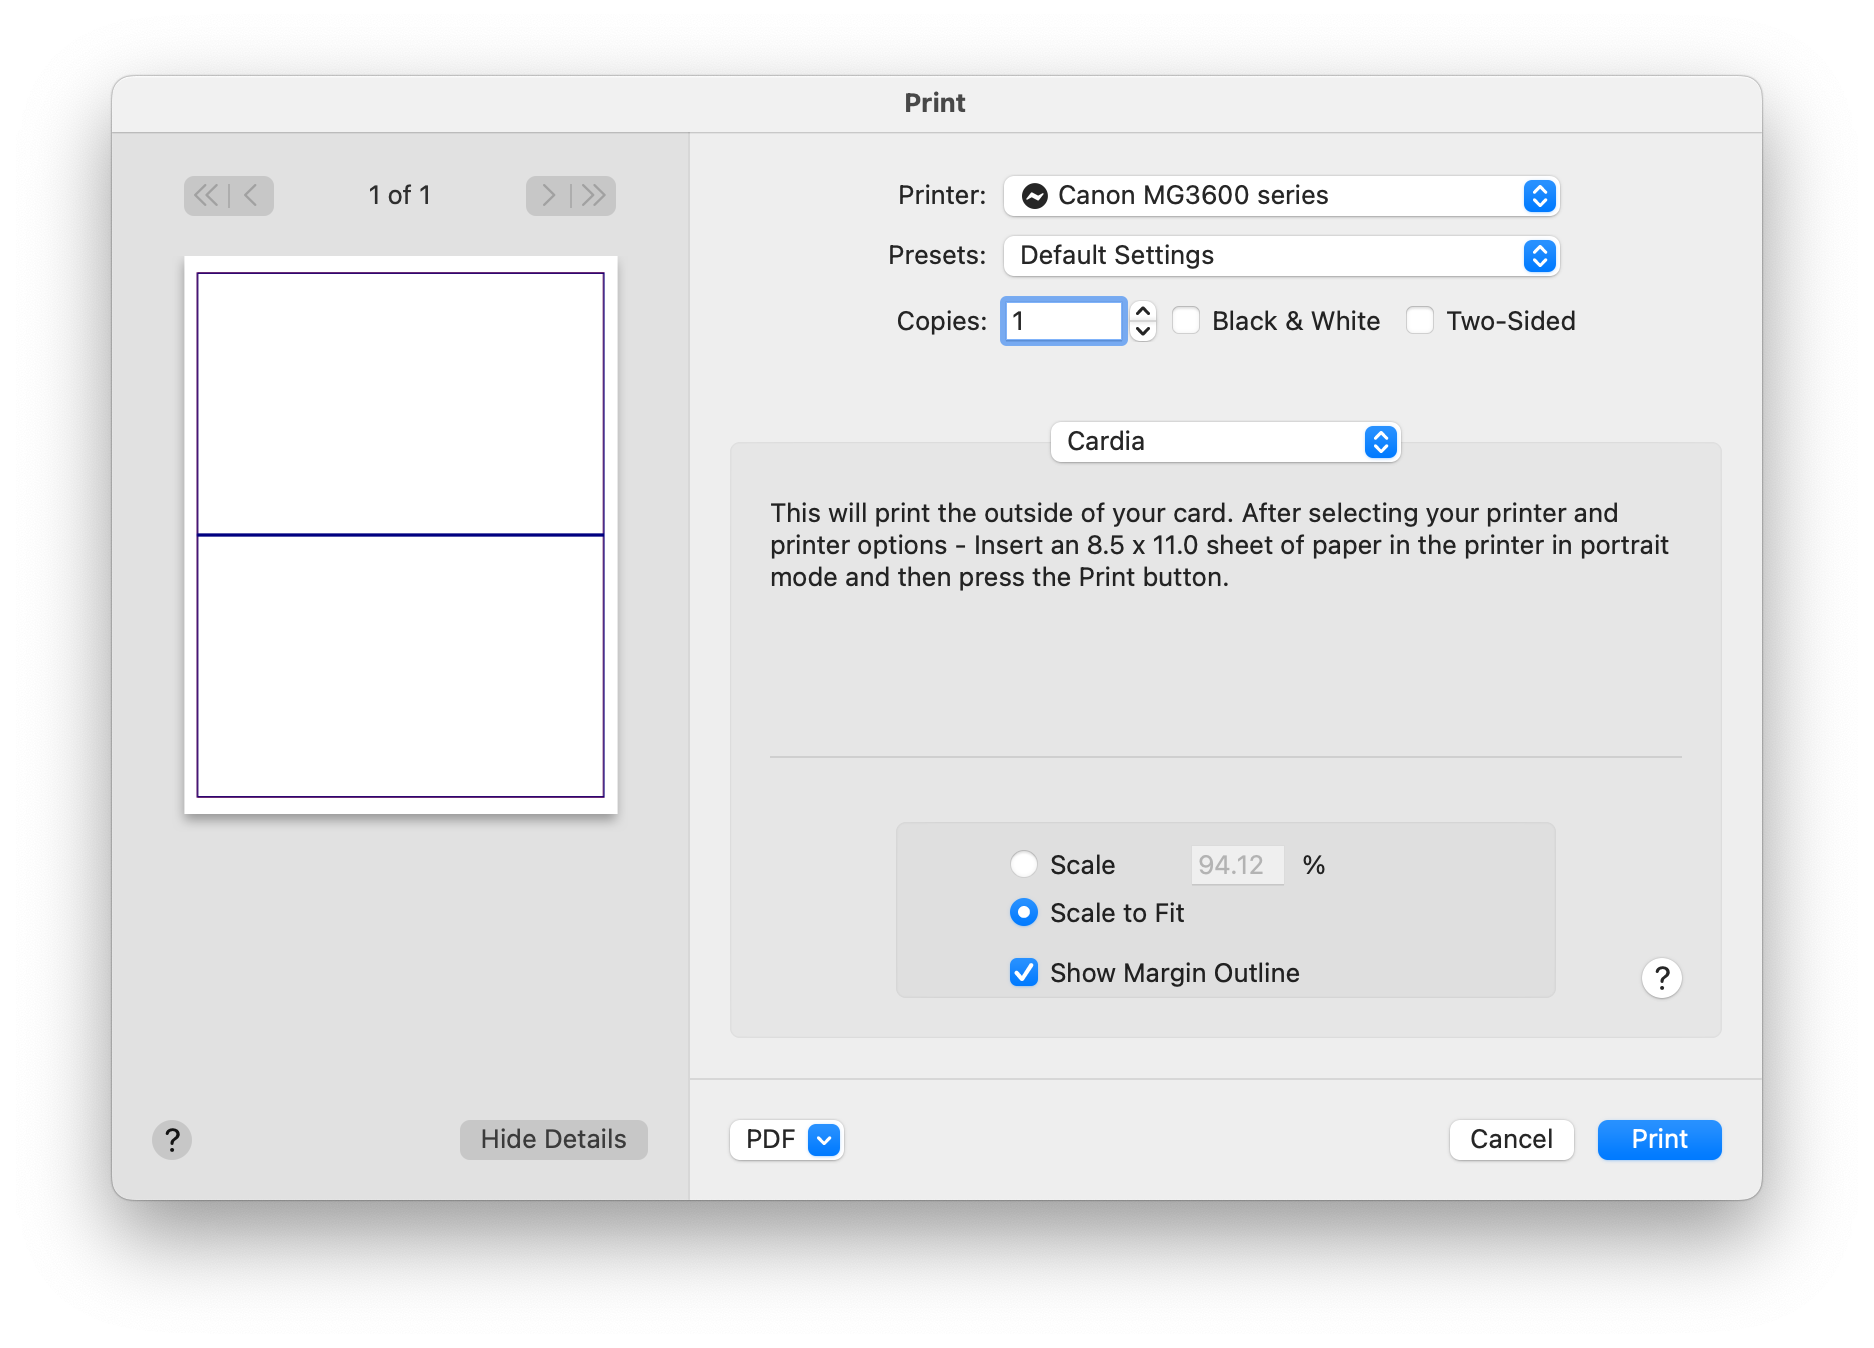
One little problem... Cardia sets the actual printer's margins to 0.0 inches to accomplish this virtual margin magic but an unfortunate bug in Apple's printing system will sometimes inject margins into a document for a very small number of paper sizes - even though it was told not to. The only card size affected with Cardia's built in sizes is 8.5x11". We tried to get Apple to provide a work-around but they said they are too busy making emojis to address this issue right now. If you use a card size outside of the preset Cardia card sizes it would be a good idea to check and see if the print panel added margins without you asking. To see if this is happening to one of your cards - tell Cardia to print a card side using one of the print buttons at the bottom right side of the main design window. When the print panel appears next make sure "Show Margin Outline" is checked. This will show you where the margins have been set.
Normally that blue box in the print preview should be hugging the edges of the preview as if the margins were set to 0.0 inches. If it's inset a bit, the bug injected margins. And here is how you fix that!
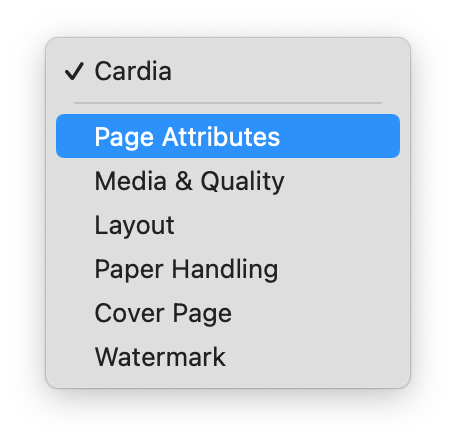
Press the Cardia dropdown button on the print panel and then select "Page Attributes". This will pop up a listing of paper size choices with your paper choice selected with a checkmark.
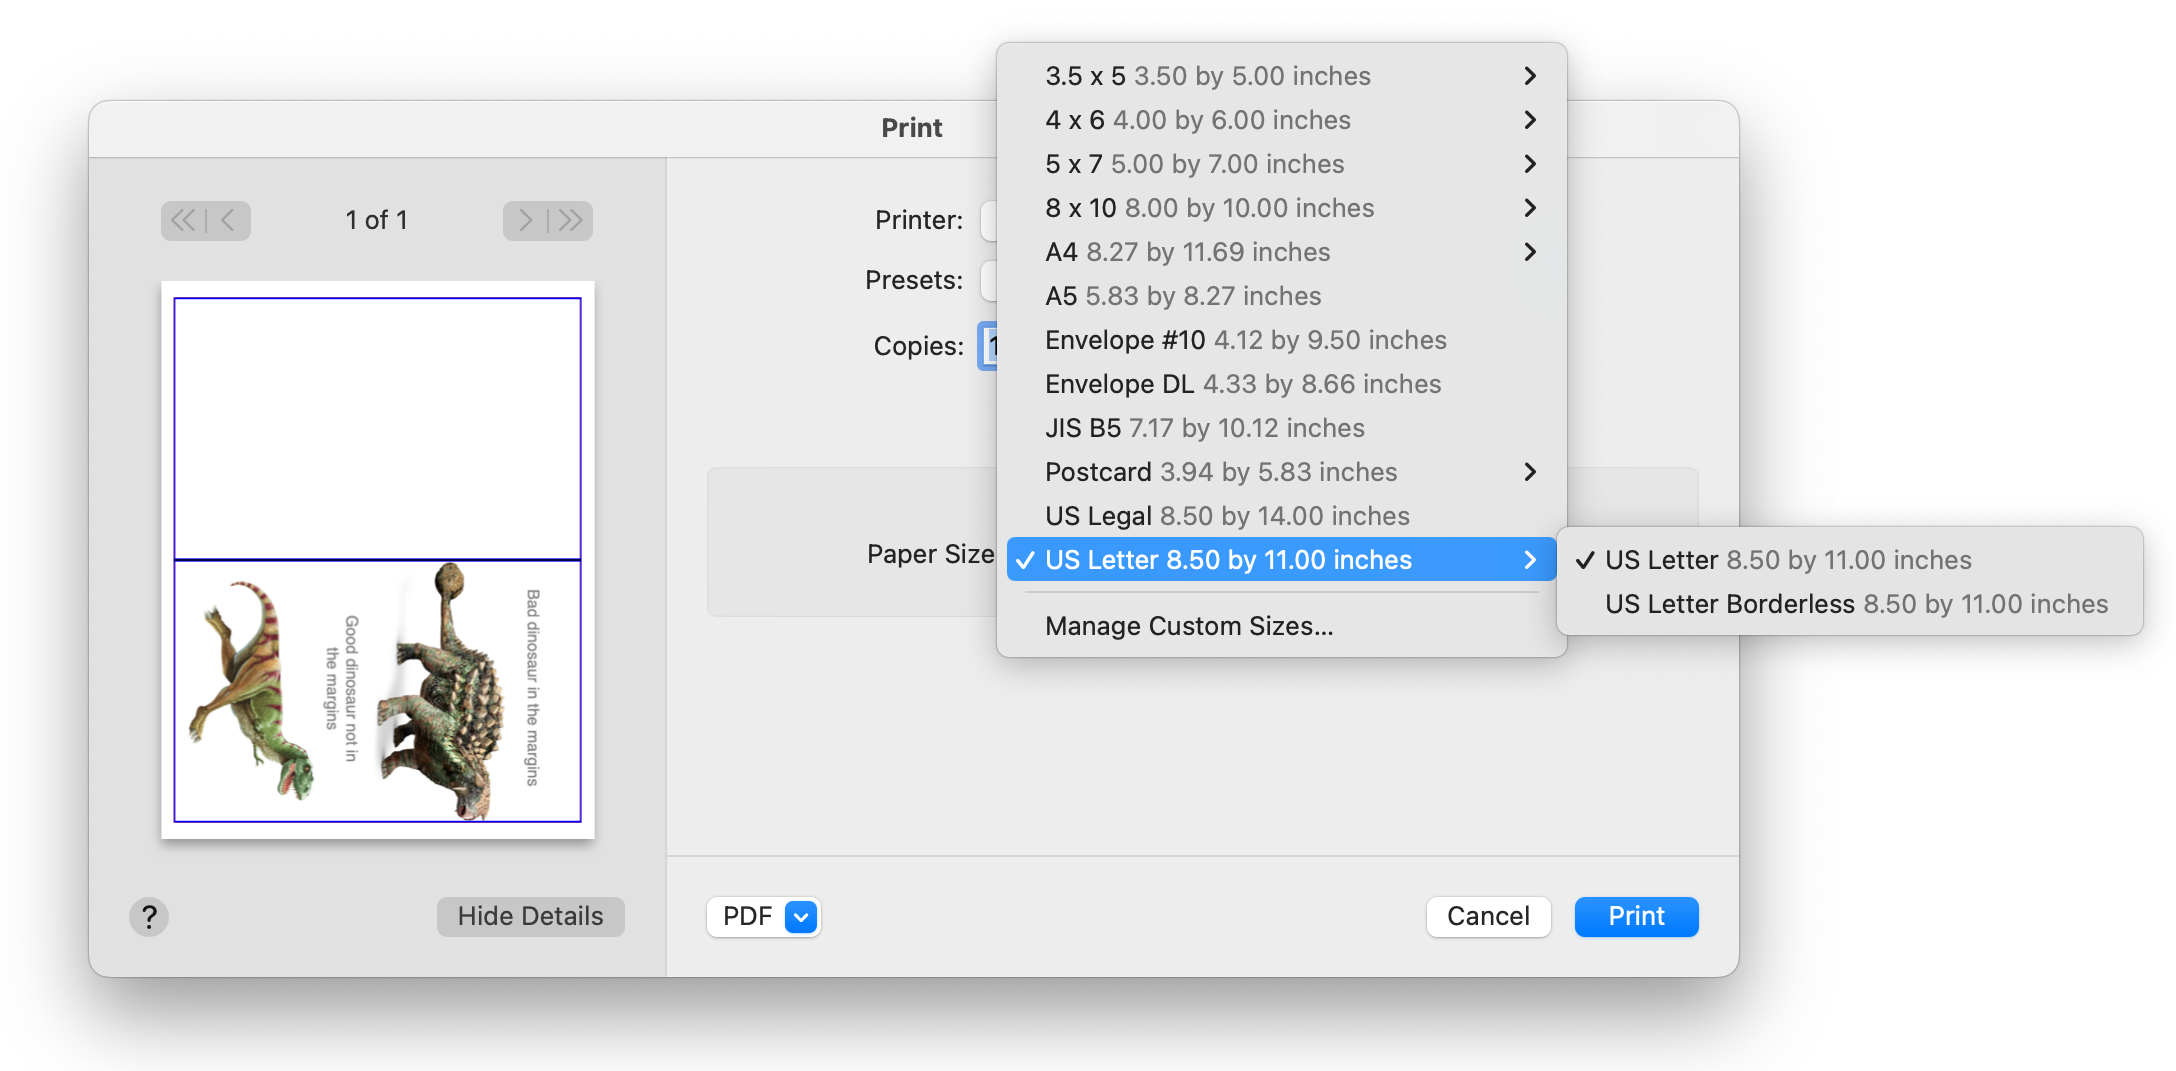
Hold the mouse down on the selected printer size and in a second or so a new menu will pop up and let you select borderless. We are working to try to find a work-around so that you will not have to
do this extra step in future versions of Cardia. This is what the blue margin outline should look like.
9. Printing Controls
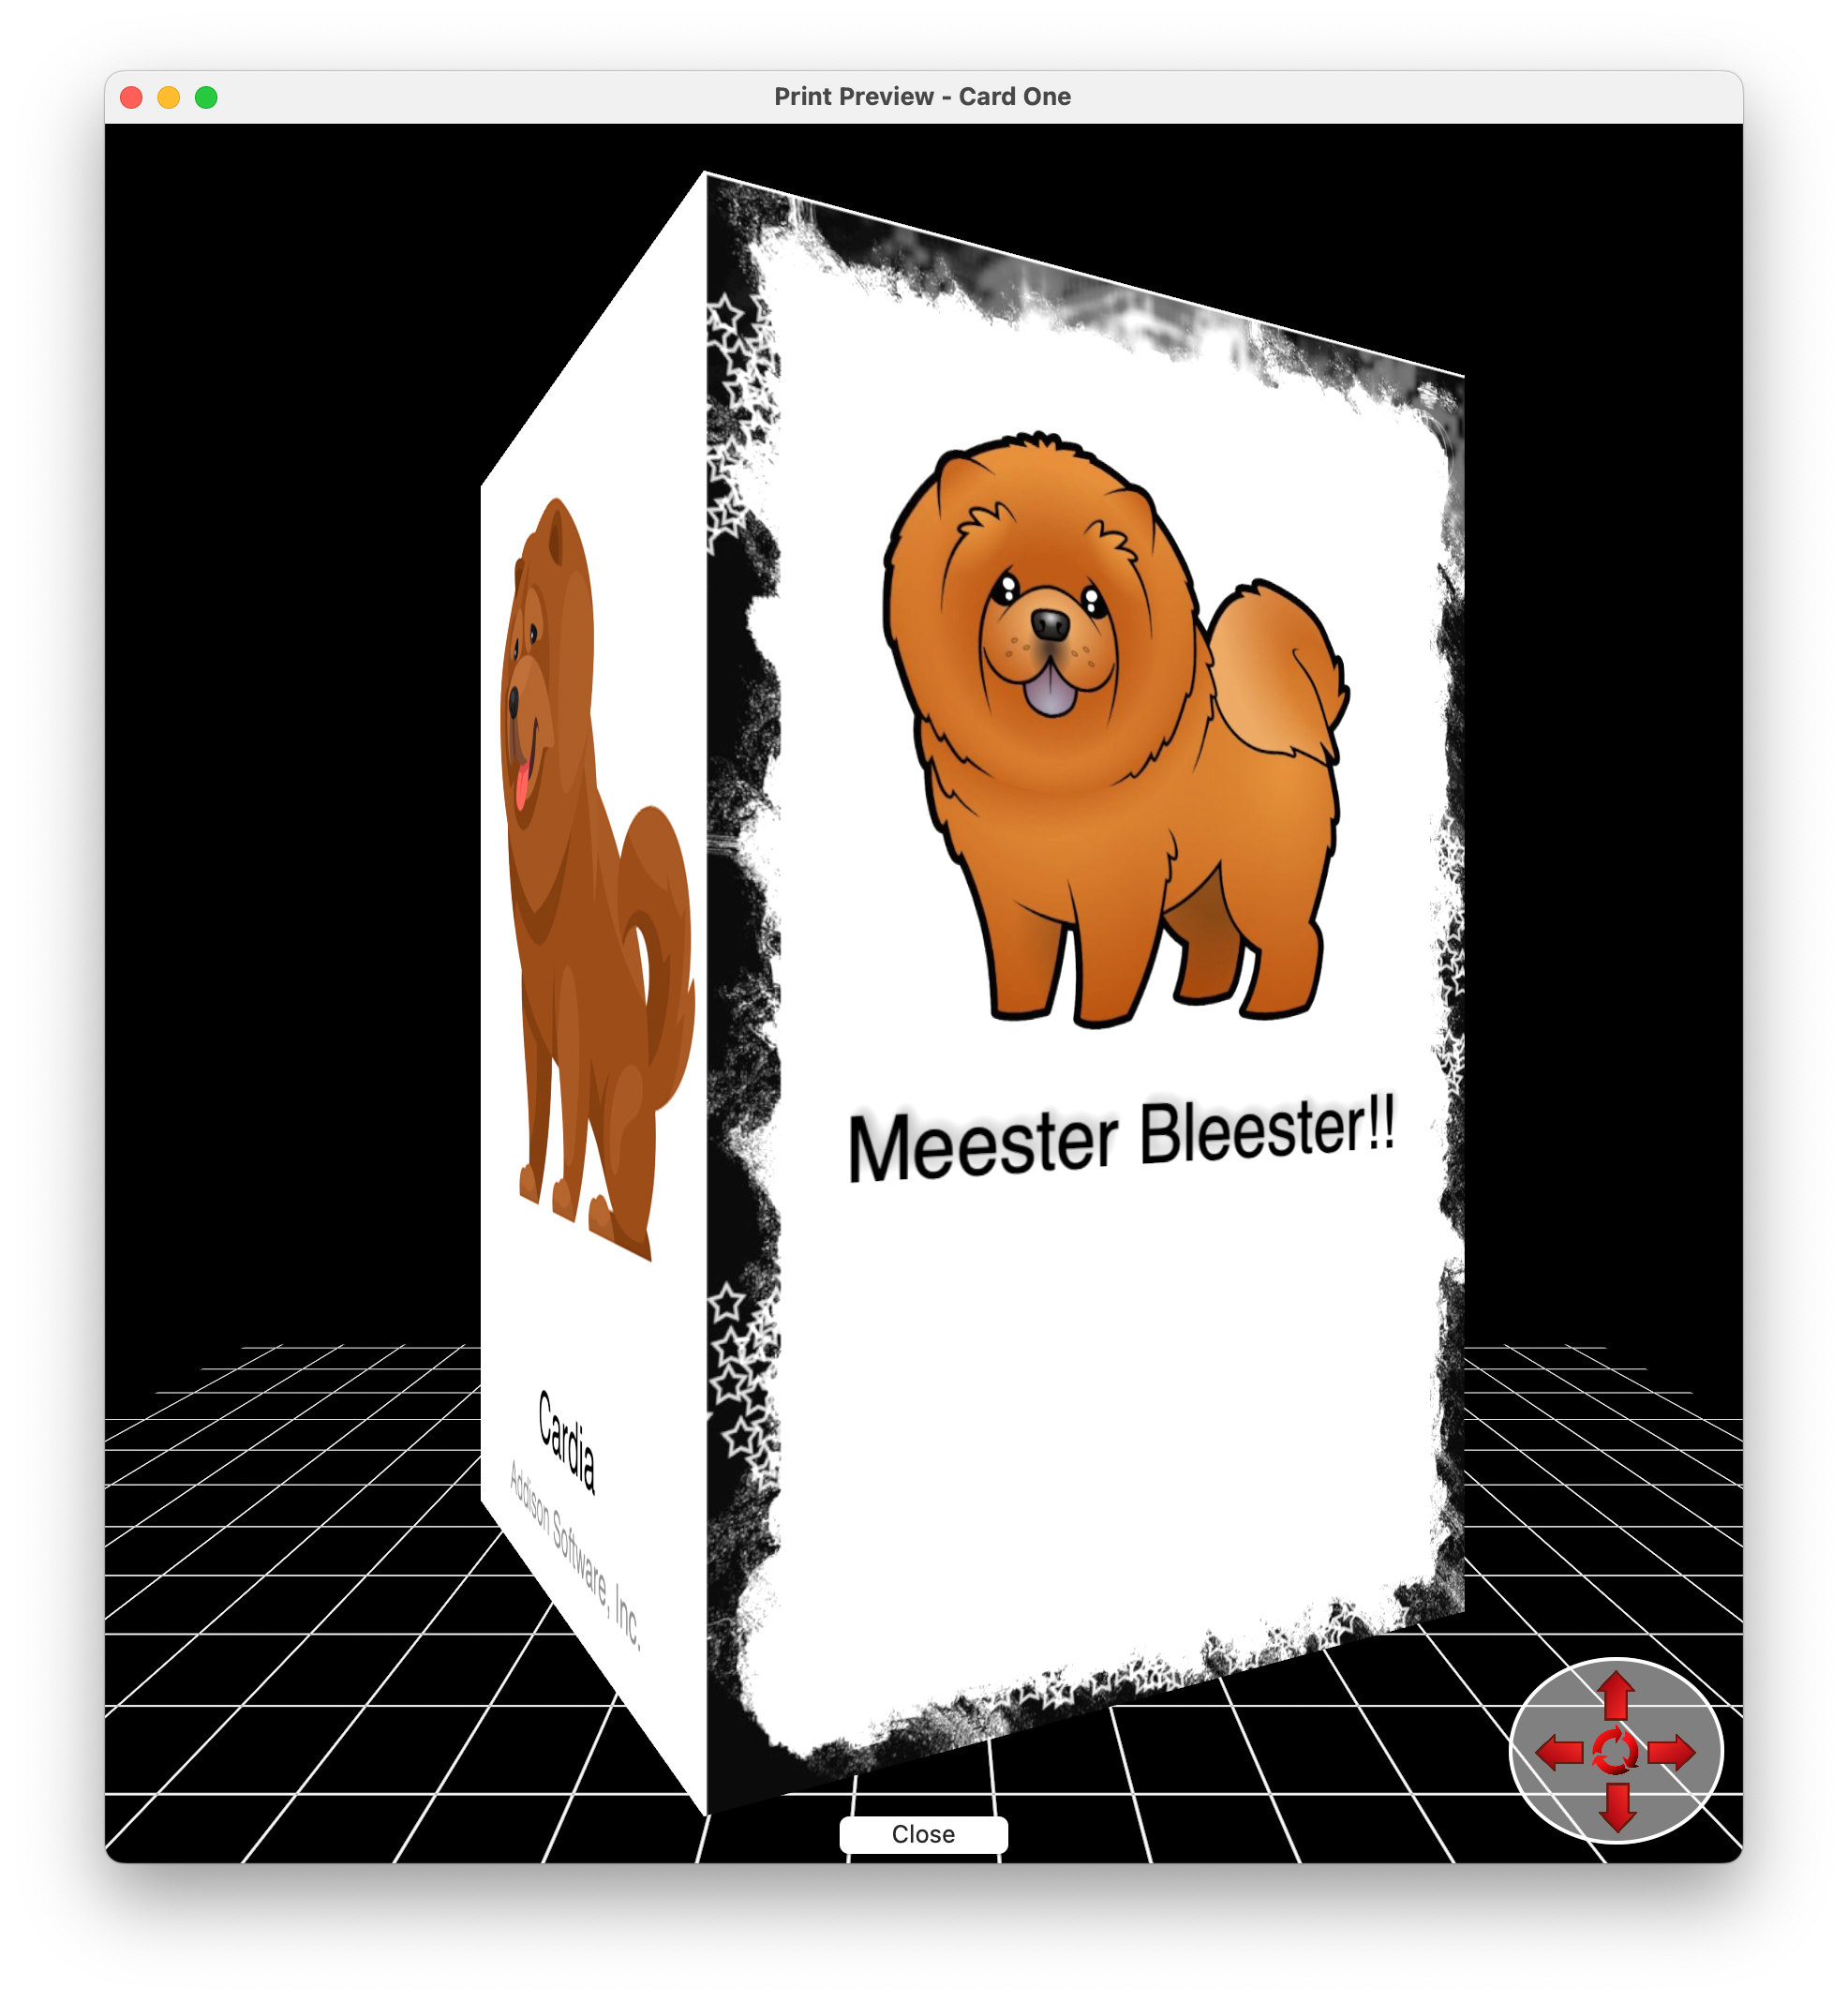
You can print your card at anytime - even when you are not finished with it. There are two ways to preview your card. The best way to get an idea of what your card will look like is to press the "Print Preview" button. This will open a new window that has a 3D representation of your card that you can rotate and flip around just as if you were holding the real card. Just use the red arrows in the lower right to spin the card around. Press the red circle of arrows in the center of the control to recenter your card.
The other two print buttons are "Print Outside" and "Print Inside". These buttons will display the standard macOS Print dialog. You can from there send your card to your printer, save it as a PDF, or look at in the Preview app - in Preview you can do all kinds of things to your card's image.
The process for the final print of your card is to print one side, then depending on the printer model - flip the paper over and send it back through the printer to print the other side. To determine how your printer orients the print it would be best to practice on a regular piece of inkjet paper to see which way you need to feed the paper in. Printers are like snowflakes. No two are alike.
Be sure to press the "Show Details" button to expand your printer's settings.

Scaling:
The are two radio buttons near the bottom of the print panel used to set the way Cardia will scale your card when it is sent to the printer. Usually you would want this to be set to "Scale to Fit. This will cause your image to be printed to the edge of the card. However, if you specified margins in a custom setup those margins will be respected and the image will fit inside the margins. Some of the macOS pre-defined paper sizes include margins. This is most noticeable in the 8x5"x11.0" paper size. If you select "Scale" Cardia will scale your card's printing area to fit inside the paper's margins.
Note: Most of the time you won't even need to specify anything about the printer here. When you are setting up the design for your card, you choose a paper size and that is what Cardia will tell the printer to use. If you want, you can override this by setting a custom paper size.
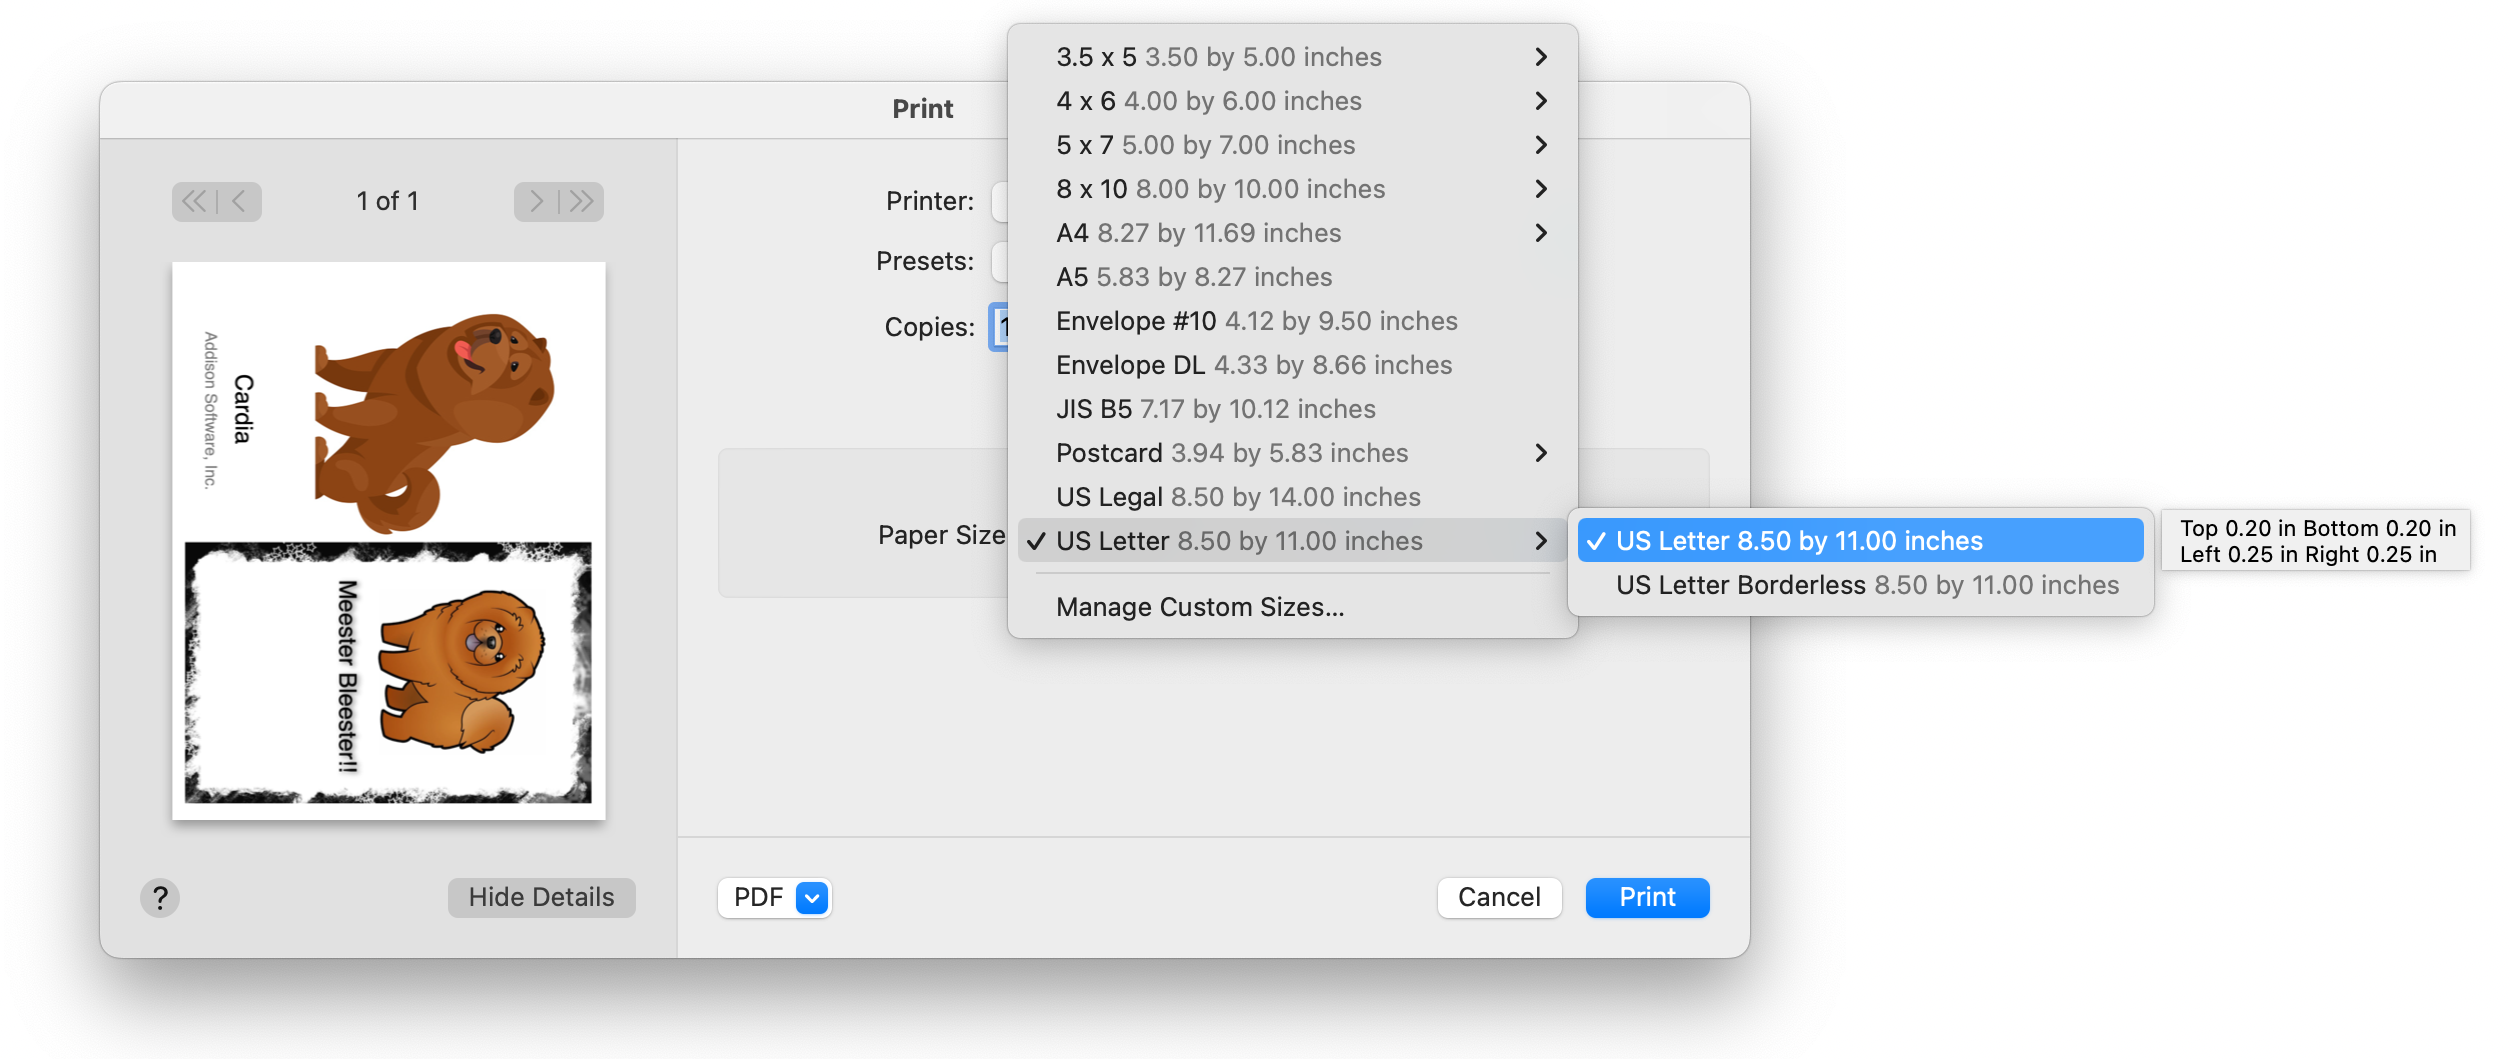
To see the preset paper sizes or define your own, press the Cardia dropdown button and then select "Page Attributes".
This will bring up a list of all the predefined paper settings the Macintosh has already defined. The paper sizes with the chevrons to the right side have several margin settings to chose from. If you hover over one of those sizes for a few seconds, a little box will appear that will tell you the margin sizes defined for that paper size. If you select "Manage Custom Sizes" do can define your own paper size and paper sizes.
Visualizing Margins:
Margins can be a mystery causing a lot of guessing and experimenting. Cardia makes that a bit more easy to work with. If you put a checkmark in the "Show Margin Outline" Cardia will give you an idea of what your margins will look like and you can change them in realtime. Just go to the "Page Attribute" drop down and select the paper you want to use. When this box is checked the print preview will have a faint blue line that shows how the printer margins are defined for the selected paper size. If you leave this box checked and print the card, this margin outline will print as well as your card images.
A Few Words About Printing to the Edge:
Printing to the edge of the paper can be difficult with some inkjet printers. Cardia will tell the printer to print to the edge but not all printers can do that. Look in the documenation for your printer and see if the paper size you want to print on is supported printing borderless. Abraham Lincoln said it best...

It's a good idea to do some tests using inexpensive paper to see how well your printer can handle going to the edge. Just cut a piece of regular inkjet paper down to the size of your card and test with that.
Tips for Printing Multiple Copies:
If you are going to print a batch of cards you can tell the macOS Print dialog the number of copies to print. You can print one side of the number of copies you need - then print the other side feeding the previously printed cards through your printer.
Experts Corner - Managing Colors in Print Output - Beta!

Mister Lizard
Cardia leverages macOS’s built-in color management to deliver accurate and predictable prints across different displays, images, and printers. Most printers produce excellent results without additional color management or ICC profiles. Newer printers generally yield better image quality, and those with more inks increase the chances of stunning results that look great to everyone. For exceptional color accuracy, however, you’ll want to use ICC profiles specific to your printer and paper combination. While ICC profiles are not essential, they provide significant benefits: consistent output from print to print and precise matching to color standards.
An ICC profile is a standard data file that describes the color characteristics of a device (like a monitor, printer, or scanner) or a color space (like sRGB or Adobe RGB), ensuring consistent color reproduction across different devices by acting as a translator for color information, allowing software to accurately map colors from one device to another for predictable and accurate prints and screen displays.
Here's an excellent explanation about Color Profiles.
A few rules:
• You can drop images using any colorspace into Cardia and they will be converted according to ColorSync's rules
• The current display's color choice is how they will be composited (sRGB, Adobe RGB, P3)
• Don't use images that have already been soft proofed with a paper ICC - ColorSync will do the translation
• Don't select paper types in the Apple print dialog - this is done in Cardia's color management settings
• In Apple's print dialog make sure ColorSync is chosen in Printer Options->Color Matching and Profile is set to "Automatic"
• Make sure you are using your printer's driver and not
AirPrint or you are going to have a bad time
To get started with color management in Cardia look under the File menu for the menu item "Print Using Color Management". Select that and the following dialog box opens.

In the Paper ICC Profile dropdown choose the ICC that matches your paper type and your printer. If you load new ICC profiles, make sure this box is closed - then reopen it. No need to restart Cardia.
In the Rendering Intent dropdown, select the rendering intent you want to use:
Relative Colorimetric is the default and usually the best choice for most users. It preserves in-gamut colors exactly, clips out-of-gamut colors to the nearest reproducible value, and adapts the white point to the paper's white.
Perceptual compresses the entire gamut smoothly, preserves visual relationships, shifts all colors slightly. Perceptual helps with highly saturated photos, landscape / nature images, and
large smooth gradients.
Absolute Colorimetric You almost never want this one. We just put it in for fun and to drive our friends over at Red River Paper apoplectic. Absolute Colorimetric is used for proofing press output, simulating
paper color, and it makes prints look dingy on purpose.
Enabling Color Management routes all print jobs through a dedicated color transformation process, using the settings you choose in this dialog. To activate it, simply select the Use Color Management checkbox.
Once enabled, you can print exactly as usual—just click one of the Print buttons in Cardia's design view. All color conversions happen automatically in the background before reaching the standard macOS
print dialog. To disable Color Management, uncheck the same box. Printing will then revert to macOS's built-in ColorSync workflow.
ICC profile support is brand new in this version — treat it as beta for now. We’re actively improving it and really appreciate any feedback you can share! Color-critical work should be double-checked
until this feature has matured.
A Little Easter Egg Called Bubbles...

If you look at the second option in the "Background Style" dropdown there is a tool called "Bubbles". When you select that you get a
new type of part tool that can make autogenerated backgrounds. It's not terribly useful but it sure is fun to play around with. The Bubbles tool will allow you to make geometric backgrounds. To see Bubbles work, select "Bubbles" from the Background Style dropdown. It's right underneath the "Solid Color" dropdown menu item. The controls in the Bubbles tool are pretty much the same as all of the others in Cardia. To see it work, start with an empty card side - then select the Bubbles tool. This tool is rather tall so on the smaller MacBooks you might need to grab the scrollbar on the right and scroll the tool upward so you can see the controls at the bottom. To see how bubbles work press the "Generate" button. This will drop a random number of bubbles on the card. The "Clear" button will clear the card side - but leave all the controls where they were. If you press "Reset Background" that will clear the page and set all the controls back to the starting setting. Try going back and setting a solid color background. Add a shadow. You can also press ⌘G to generate new backgrounds incase the "Generate" button is scrolled out of view. Just fiddle around with the controls!

It gets better. Scroll the toolbar so that you can see the image of the bubble. Now, drag the image of the little frog above and drop it on the bubble. Next press "Generate". To make the frogs stand out a little more check the "Shadow" checkbox and press "Generate" again. You can drop almost any image on the bubble. The best images to use are usually transparent .png's - but non transparent images can look good too. Experiment with all the settings - and just press "Reset Background" to reset the controls back to their initial settings. Let us know if you have any questions!
Support
Support is available by email seven days a week. Please contact us with any questions or suggestions. We can't wait to hear more ideas from you of what you want to see in Cardia!
Beta Testing and News!
If you would like to know when a pre-release is ready and help us test it or hear about new features and tutorials please send us an email letting us know. We promise not to spam you with ridiculous time wasting emails.
Addison Software, Inc. info@addisonsw.com
Macintosh and macOS are trademarks of Apple Inc., registered in the U.S. and other countries and regions.